Showing posts with label how-to. Show all posts

Wednesday, November 10, 2010

Creating A Dummy Book - Part2 - Adding the Book Covers

Example of a Finished Dummy Book
By Carolyn Dee Flores


  1. Fold black cloth tape over the left edge of your booklet, covering the staples on both sides. 


  1. Cut 2 Pieces of Black Foam Board For Covers.
Add ¼" to the width, and ½" to the height  of your picture book format for book cover dimensions.
  For example, for an 8" x 10" landscape picture book :
                                (2) pieces of foam board (8½" x 10¾")


  1. Hinge the foam board covers to the front and back of your book with a single strip of black cloth tape, as shown here.
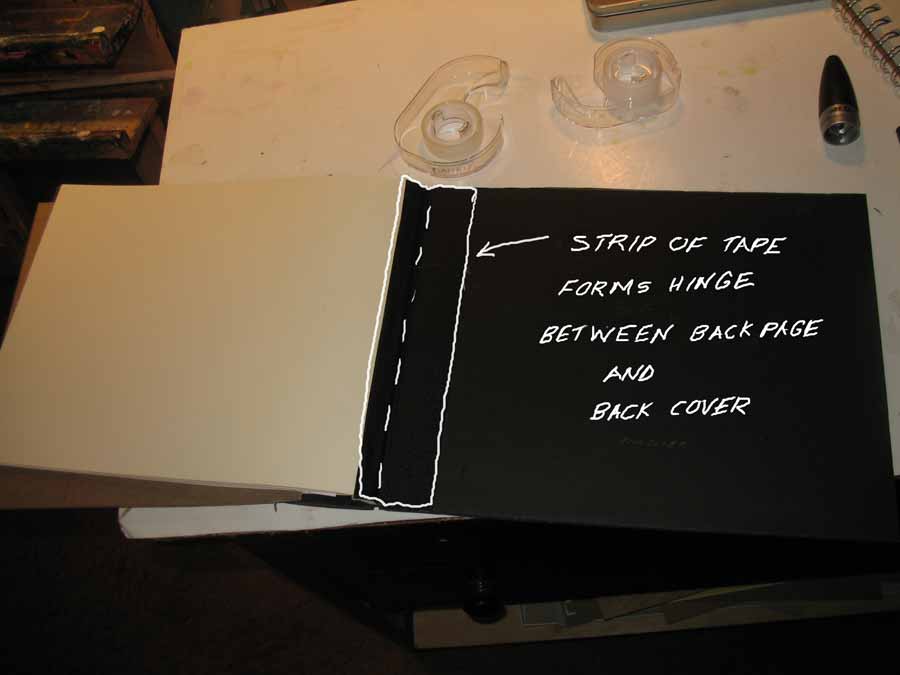


  1. Bind your book on the outside with a vertical strip of black cloth tape.
At this point, your book should be able to stand when propped open on its side, as shown here.


  1. Mark The Front Of Your Book.


  1. To create the jacket for your book, cut a piece of white brochure  paper (2½ times the width of your book by the height of your cover.) Wrap the paper around your book and fold  to allow for jacket flaps. Adhere with scotch tape. 


  1. Dummy book with cover.


Next time, "Creating a Dummy Book Part3 - Content."
              Carolyn Dee Flores
                                http://www.carolynflores.com/

Saturday, October 30, 2010

Creating a Dummy Book For Illustrators - Part1

Creating a 8 x 10 Dummy Book - PART1
"Creating the Inside Pages First"


  1. Start with a clean work area and plenty of room.
  2. Decide the format your book .
I chose a standard picture book format:

8" x 10" landscape

32 pages
  1. Write down your calculations on a piece of paper.
My book requires 16 pages for a 32 page book.
I will measure each page to 10½" x 8". Notice  I  added ½ inch to the width to allow for binding.


  1. Cut your paper to the correct measurements.
Using a paper cutter, I cut 16 pages  of sturdy drawing paper to exactly 10½" x 8".


  1. Mark off your binding area on each page.
This is important because this will indicate where you score each page.
Draw a vertical dotted line ½ " away from the left edge of each page to allow for binding.
This will leave exactly 10" x 8" pages for viewing.


  1. Score your pages along the dotted line.
The scoring option is found on some paper cutters. It creases the page but does not cut thru it, in order to provide for a clean fold. - (It is just a step short of perforation.) If you do not have this option, fold back and forth cleanly upon the dotted line.


  1. Clip your pages together using binder clips.
I start by stacking the 16 pages together and making sure the stack is even.
 Make sure all  "binding borders" are on the same side.
Now, using binder clips, I clip the stack together - away from the binding side to make sure the stack will remain as even as possible when stapling.


  1. Staple your book together using a heavy duty stapler.


  1. You should have a booklet without endcovers at this point.


  1. Number lower page corners lightly with pencil from 1-32.

I will continue with Creating A Dummy Book for Illustrators - Part2 in my next blog.
Carolyn Dee Flores